
Photo organizer.
Create great slideshows, based upon the metadata in the photos.
Show those slideshows with Photo viewer.
Nederlandse site.
|
Photo organizer.Create great slideshows, based upon the metadata in the photos. |
Nederlandse site. |
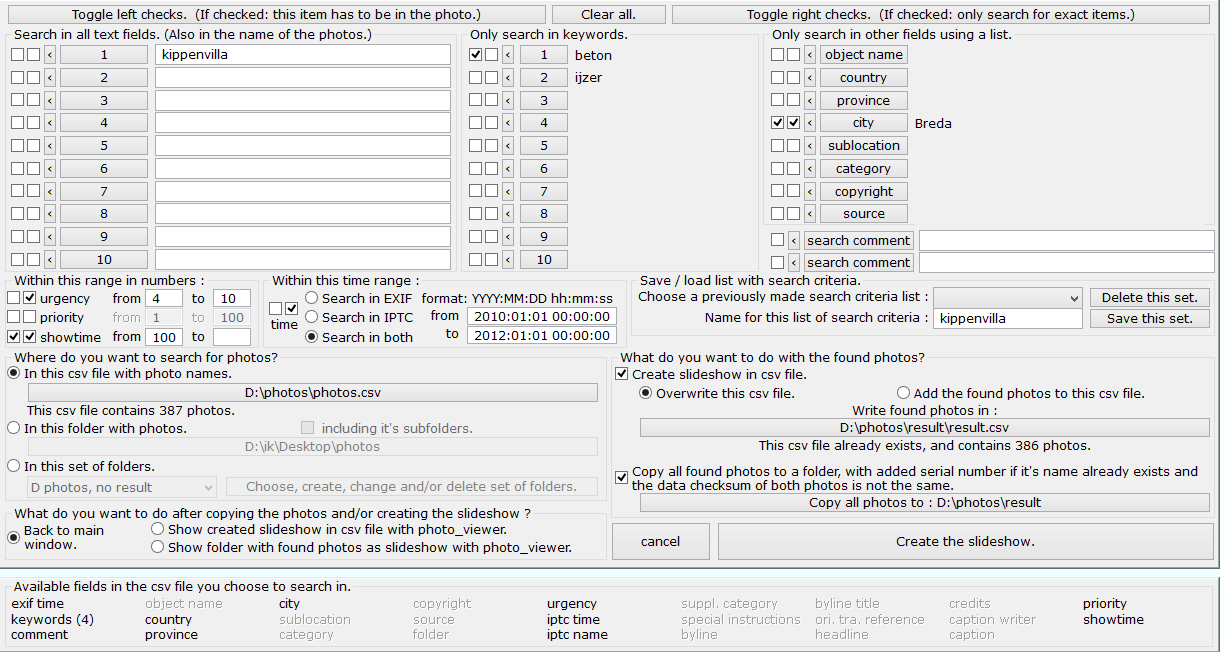 The dialogbox which gives you an overview of all the fields and criteria you can use to define your search.
 By clicking on any of the buttons in this dialogbox you go to the lists from which you can choose a keyword or another item. This works exactly the same and uses the same lists as you have probably
already done a lot of times when you were writing the text fields into you photos. Using these lists is explained here.
By clicking on any of the buttons in this dialogbox you go to the lists from which you can choose a keyword or another item. This works exactly the same and uses the same lists as you have probably
already done a lot of times when you were writing the text fields into you photos. Using these lists is explained here.
 The fields in the middle of the window are the keyword fields. In this example, the leftmost checkbox is checked on the top line, so a photo does need to have the keyword beton otherwise
it is never considered to be part of the slideshow. The second keyword ijzer is one of the non-mandatory used fields. At least one of these non-mandatory fields need to be found
in the photo before the photo is considered to become part of the slideshow. Here you can only use the keywords as written in the usual keyword lists which you can easily reach by clicking on any of the
numbered buttons. And with the little button with the < on it you can empty this field.
The fields in the middle of the window are the keyword fields. In this example, the leftmost checkbox is checked on the top line, so a photo does need to have the keyword beton otherwise
it is never considered to be part of the slideshow. The second keyword ijzer is one of the non-mandatory used fields. At least one of these non-mandatory fields need to be found
in the photo before the photo is considered to become part of the slideshow. Here you can only use the keywords as written in the usual keyword lists which you can easily reach by clicking on any of the
numbered buttons. And with the little button with the < on it you can empty this field.
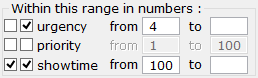 These are the 3 fields which uses only numbers. The range for urgency is 1 to 10, the range for priority and showtime is 1 to 255. Here the right checkboxes
work a little bit different. If it is checked, the field is used, otherwise the rang editboxes stays grey and you can not type anything in it, like priority in this example.
These are the 3 fields which uses only numbers. The range for urgency is 1 to 10, the range for priority and showtime is 1 to 255. Here the right checkboxes
work a little bit different. If it is checked, the field is used, otherwise the rang editboxes stays grey and you can not type anything in it, like priority in this example.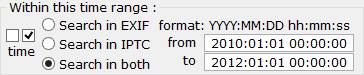 You can search for photos within a certain time range. In this example from 2010:01:01 00:00:00 to 2012:01:01 00:00:00. With the radiobuttons you choose to search in the
EXIF time, in the IPTC time or in both. In this example, the left checkbox is not checked, so this field is not mandatory in the photo.
You can search for photos within a certain time range. In this example from 2010:01:01 00:00:00 to 2012:01:01 00:00:00. With the radiobuttons you choose to search in the
EXIF time, in the IPTC time or in both. In this example, the left checkbox is not checked, so this field is not mandatory in the photo.
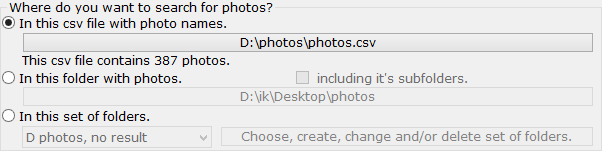 You can search directly in the photos themselves, or you can search in a CSV file with metadata which you have created before. Searching in a csv file is faster, which might be important if you search in a
large collection of photos. But if the csv file has been changed manually or if the photos which are mentioned in the csv file have been changed of moved after that csv file was created, you may not get
the correct results.
You can search directly in the photos themselves, or you can search in a CSV file with metadata which you have created before. Searching in a csv file is faster, which might be important if you search in a
large collection of photos. But if the csv file has been changed manually or if the photos which are mentioned in the csv file have been changed of moved after that csv file was created, you may not get
the correct results. Which you will see at the bottom of your window when you choose to search in a csv file.
 You can name a set of search criteria and save it, so you can later use it again as a basis for another search. Just fill in a name in the editbox and click on the Save this set. button.
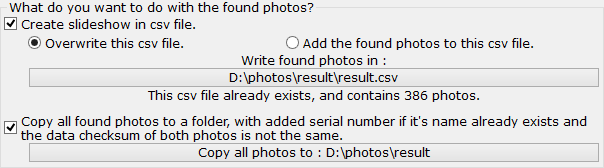 You can create a slideshow in a csv file by checking the topmost checkbox here, as also done in this example. With the topmost long button you choose the location and the name of the csv file you want
to create or add photos to. In this example it is D:\photos\result\result.csv.Just below the button you can see that that csv file already exists and now contains 386 photos.
You can create a slideshow in a csv file by checking the topmost checkbox here, as also done in this example. With the topmost long button you choose the location and the name of the csv file you want
to create or add photos to. In this example it is D:\photos\result\result.csv.Just below the button you can see that that csv file already exists and now contains 386 photos. After searching for the photos for your slideshow you can immediately show them with photo viewer or you can pause the program before you go back to the main window or do another search.
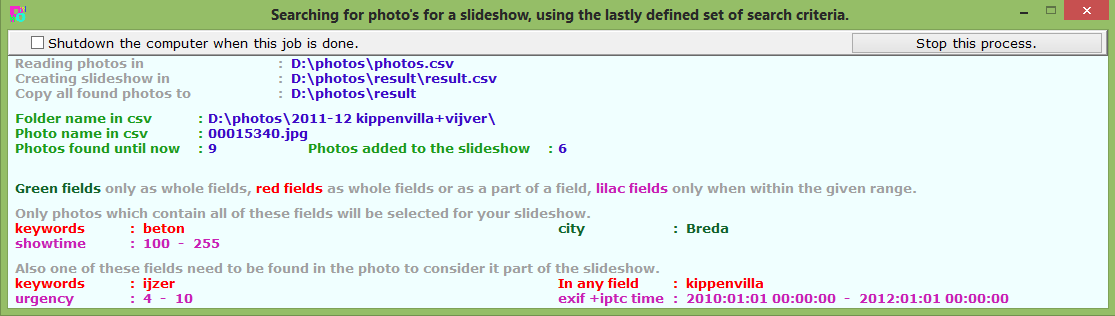 After clicking on the Create the slideshow. button the window gets smaller and Photo organizer shows you what it is looking for and where. During this process you can stop it by
clicking on the Stop this process. button. You can also instruct it to shut down the computer after the search is done by checking the Shutdown the computer when this job is
done. checkbox.
After clicking on the Create the slideshow. button the window gets smaller and Photo organizer shows you what it is looking for and where. During this process you can stop it by
clicking on the Stop this process. button. You can also instruct it to shut down the computer after the search is done by checking the Shutdown the computer when this job is
done. checkbox.
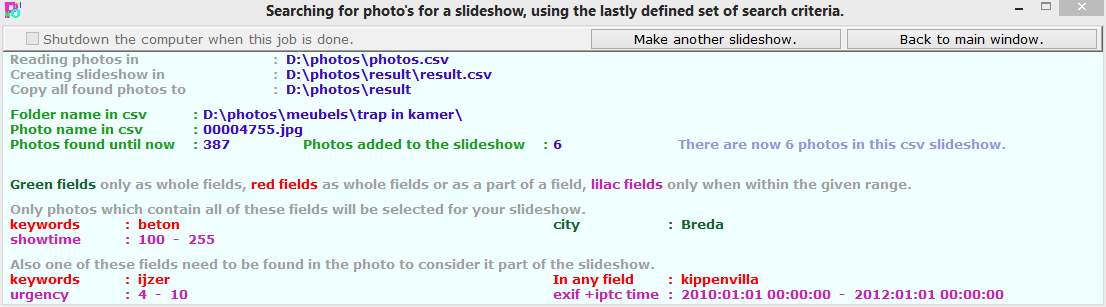 When the search is done, Photo organizer tells you how many photos have been found during this search. In this example the csv file which is created now contains 6 photos.
| Hans van der Hoeven Liesbospark 28 4813 HV Breda The Netherlands |
Program explanation FAQ |
home Contactform Get a key |
mail:info@photoorganizer.nl © 2015, Hans van der Hoeven URL: www.photoorganizer.nl |
| © HHdesign. | Webmaster: HHdesign. |