titlebar jump to timing background seam of book show extensions show in titlebar style of showing show folder or csv quit explanation shortcuts ok language all_monitors. not bigger sort photos make random show click_flip csv_metadata subtitle subtitle font font example lines aliased show metadata
home

Photo viewer.

Show your images safe and free with Photo viewer, the fool-proof photo viewer for windows.

Uitleg in het Nederlands.

Photo viewer is designed to be a small and simple viewer with which you can show your photos in 5 different manners. Four of those manners show 2 photos at once, like the pages of a book, where each page contains one photo. The difference is in the style in which the pages are flipping. The fifth method is only showing one photo at a time. And then you can use a magnifying glass over your photo and you can see all or part of the metadata in the photo if it is a jpg or jpeg file.
Changing to the next or previous photo can be done manually, by clicking the mouse or arrow keys, or automatically with fixed or variable timing, depending upon the showtime in the image or the location of the mouse on the screen.
Photo viewer is called fool-proof because the program is simply not capable to write to any image, so no matter how it is treated, it is never possible to change any of the images with it.

Main dialogbox for Photo viewer. 
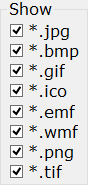
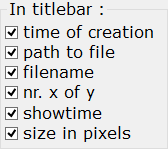
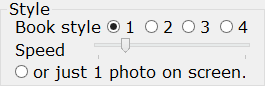
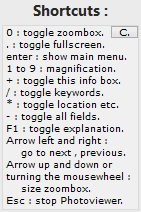
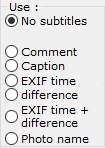
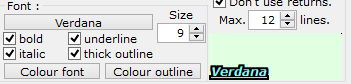
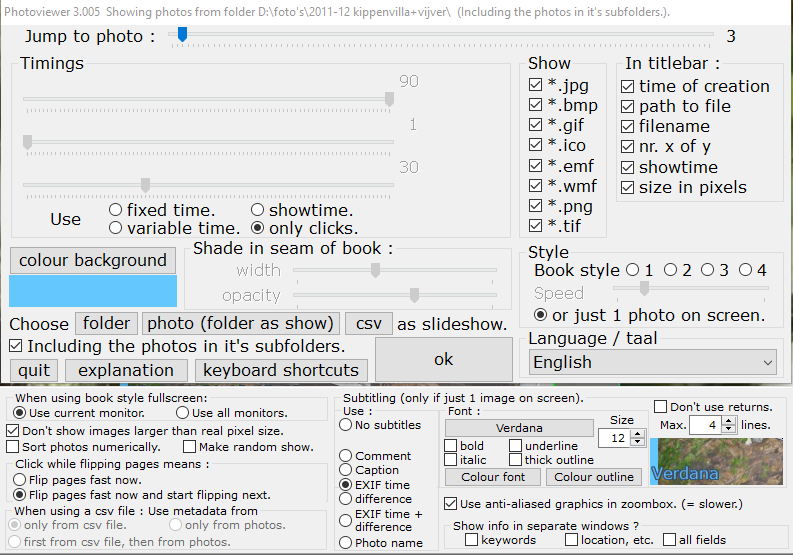
When you start with Photo viewer for the first time it will open this dialogbox. You can also open this dialogbox while the program is active by pressing Enter or when you click the mouse while the virtual menu item Show menu is visible.
This dialogbox contains all the settings for the program in one window. You do not really need the keyboard, because all functions can be reached and set by only using the mouse.

Click on any part of this dialogbox to directly jump to the relevant explanation on this page.

Virtual menu.

The virtual menu.
The virtual menu becomes visible when you get close to the top of the photo. When you are showing just one photo on your window, the functions are (from left to right): Show menu, explanation, keyboard shortcuts, keywords, location, etc., all fields, toggle zoombox, magnification factor in zoombox 1x, 2x, 3x, 4x, 6x, 8x, 12x, 20x, 40x and fullscreen.
When showing 2 photos at once, only the virtual menu items Show menu, explanation, keyboard shortcuts and fullscreen are available.
In this example you can see the Show menu virtual menu on top of the zoombox which shows the real pixelsize of a little piece of the photo. At the bottom of the window you see the EXIF time which was read in the photo and the difference with the EXIF time which was read in the previously shown photo.

Window title.

window title
The dialogbox titlebar tells you the version of the program Photo viewer (here 3.004) you are currently working with and the source of the photos you are showing. In this example the photos mentioned in the folder D:\foto's\2003 IJsbloemen op gevel van kas buren\ are on display, including all photos in the sub folders of that folder.
Jump to photo ...
By clicking on this bar, you can choose the location in the current collection of photos to which to jump to directly after closing the dialogbox. The number at the right side of the bar starts as the current location of the photo which is shown and will become the chosen location if you click on the bar.

How long to show a photo?

How long to show a photo.
There are several methods to determine how long a photo will be shown:

fixed time. All photos are shown for the same length of time, determined by the Fixed time per picture: bar.
Showtime used for timing photo.
showtime. The time each photo is shown depends upon the showtime as written in the photo. The maximum time is when the showtime is 255, the minimum time is when the showtime is 1 and when there is no showtime defined in the photo the timing depends upon the third bar.
Variable timing used for timing photo.
variable time. A maximum and a minimum time can be specified by these two bars. The actual time for each photo (and direction of flipping) can then be set by the location of the mouse on the photo. If the mouse is on the left half of the window, the flipping goes backwards and if the mouse is on the right side of the window, the flipping goes forward. The minimum time is used when the mouse is on the middle of the photo and the maximum time is used when the mouse is on the left or right edge of the window. The actual used direction of flipping and the actual time for the current photo can be seen in the titlebar of the window when the showtime checkbox is checked. (as is explained here).
only clicks. No automatic timing is used. You only go to the previous photo by leftclicking on the mouse or pressing the left arrow key on your keyboard and you go to the next photo by rightclicking with the mouse or by clicking the right arrow key on your keyboard.
All automatic timings can always be interrupted by clicking the mouse or pressing the arrow keys.

Background and seam of book.

Background colour.
The coloured rectangle is the colour you use as the background for the images during your show. You can choose any colour you like by clicking on the colour background button.
width and opacity of seam in book
If you are showing 2 photos at once, you can define a shade to be used in the seam between the two photos, just like the seam in a real book. Both the width and the opacity can be chosen by sliding the bars or by clicking on the bars.

Choose which images will be shown.

Choose which extensions to show.
By selecting these checkboxes, you choose which image types are to be shown. If you start the program by dropping an image on the program, the type of that image is automatically selected to be included in the show.

The text in the titlebar.

Visible in titlebar
With these checkboxes you select which item you want to be visible in the titlebar of the active window.

5 styles to show your images.

Visible in titlebar
Here you choose one of the 5 different styles of showing your images. The 4 book styles only differ from each other by the way the pages are flipped. The Speed bar lets you choose the speed of flipping the pages while you are using one of these four book styles.
Only when using the fifth style, with only one image visible at any given moment, you can use the magnifying glass or show the metadata from JPG or JPEG files.

How to start a new show.

Choose folder or csv file with images.
With the button at the left side you choose a folder to start your show from. With the middle button you choose an image with which you start a slideshow from all selected filetypes in a folder. If the checkbox is checked, all images in the subfolders of the folder you are using as a show will also be included in the show.
With the button on the right side you can select a csv file with a list of images to be shown as a show. These csv files need to have the correct layout, as created by Photo organizer.
Another method to start a new show is to simply drop an image or a folder on the open window or icon of Photo viewer to show a folder as a slideshow or to drop a suitable csv file on the window or icon of Photo viewer to show it as a slideshow.

Quit and explanation.

Quit and explanation.
With this leftmost button you quit Photo viewer. (Photo viewer will save all settings so that it can continue next time as if it was never stopped).
The Explanation button opens another dialogbox where the main characteristics of the program are explained. This explanation dialogbox can also be opened (and closed) with the virtual menu.

Keyboard shortcuts.

keyboard shortcuts.
This button opens a little dialogbox in which you can read which keyboard shortcuts are available.

keyboard shortcuts one photo style. keyboard shortcuts book style.
In the bookstyle most keyboard shortcuts are not available, so they are grey, as in the example here on the right.
All of the mentioned functions here can also be reached with the virtual menu by going close to the upper edge of the window with your mouse.

ok.

ok.
This button closes the dialogbox and lets you continue with the current show, using the newly chosen settings.

The language for the user interface.

Interface language.
English and Dutch are both embedded in the program and can always be chosen here. More languages may become available. If so, it will be published on the site.
If you want to contribute by translating the used text for the interface, contact me via the Contactform. I will then provide you with a list of items to be translated and how to format the plain textfile, so that it will be usable by Photo viewer. The only thing the user needs to do to use it is to download that txt file and place it in the correct folder. Photo viewer will then make it available via this dropdown box.

Use 1 or all monitors?

One or all monitors.
If you have more than 1 monitor available on your system, you can choose here what to do if the program uses fullscreen when it is in one of the 4 book styles: Use only the currently used monitor or use all available monitors. When you use the style with only one image on your screen, fullscreen is always limited to the currently used monitor.

Show images not bigger than original.

Show image not bigger than original.
With this checkbox you can choose to show images never larger than it's actual size in pixels or you can stretch such images to fill the width or height of the used window. However, the aspect ratio is always preserved.

Sort photos numerically.

Sort photos numerically.
Before the show from the photos in a folder starts, all photos are read by Photo viewer. If you use numbers as filenames which start with leading zeros, the sequence in which Windows presents the images seems to be not very logical. By selecting this checkbox, all the photos in the show are sorted numerically, so the sequence will be according to the numbers in the filenames.

Make random show.

Make random show.
By checking this checkbox the sequence in which the photos will be shown will be completely random, so you never know which photo will be next.

How to flip pages.

How to flip pages.
When showing the photos in one of the book styles, flipping the pages can take some time. If you click the mouse while the pages are flipping, the rest of the flipping is done immediately. Choose here what will happen then: nothing or starting to flip the next page.

Where to read the metadata.

Use which metadata?
When you use a csv file as the source of showing photos, there can be 2 sources of metadata for the photos. It can be in the csv file and it can be in the photos themselves. Normally the metadata in these 2 are the same. But both of them can be changed after the csv file was created by Photo organizer. Here you can choose which source will be used while showing the photos.
If you choose for the option first from csv file, then from photos. you will only use the metadata from the photo itself if that particular field is not available or empty in the csv file.

Subtitles.

Subtitles.
When you are showing jpg or jpeg photos, you can use metadata as subtitles which will be shown near the bottom of your window. Here you can choose which metadata, if any, you want to use for your subtitles. The choice difference shows you the difference in time between the photo on your screen and the previous photo on your screen, as in the example at the top of this page here.

Font for subtitles.

Font for subtitles.
Subtitles are written near the bottom of the window as outlined text. Here you can choose which font you want to use and in which size and style. Also the colours for the text and for the outline of the text can be chosen freely.

Use carriage returns in subtitles.

Use carriage returns in subtitles.
If you use comment or caption as subtitle, there can be quite some carriage returns in it. Sometimes this is a bit annoying. Here you can choose to substitute those carriage returns each by a few spaces so that the full width of the window is used for the subtitles. And with the textbox you can limit how many lines of text may be used by the subtitles. In the case the text does not fit in those lines, the rest is simply skipped.

Anti-aliased image in zoombox?

Anti-aliased image in zoom box?
Choose here how you want the piece of your image to be shown in the zoombox. With smooth edges (anti-aliased) or not.

Show metadata.

Show metadata.
With these checkboxes you can choose which metadata you want to show in a separate window. If you choose for all fields, the other two will be closed if they were opened. And if you choose one of the other 2, the all fields window will be closed. In those windows there is a button C. with which you can close that window.

Go back to where you came from.


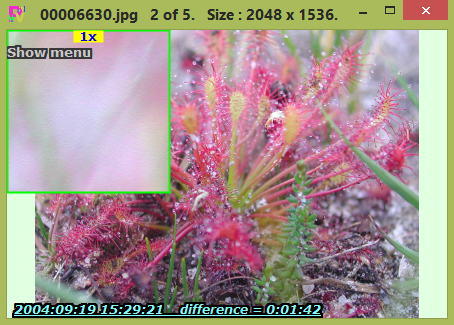
Hans van der Hoeven
Liesbospark 28
4813 HV Breda
The Netherlands
Photo organizer explanation
FAQ
home
Contactform
Get a key
mail:info@photoorganizer.nl
© 2015, Hans van der Hoeven
URL: www.photoorganizer.nl
© HHdesign. Webmaster: HHdesign.